

Blockchain Data Indexing: A Full Course - Lesson 1

Software Engineering, Blockchain, Basket, Science 🇮🇹🇬🇧🇫🇷 If I have seen further it is by standing on the shoulders of giants
Subsquid is the team behind squids, a new standard for Web3 data extraction and transformation. Squids already power hundreds of applications across dozens of EVM, Substrate, and WASM-based chains. With modular architecture and a host of advanced features, Subsquid offers the most resource-efficient and developer-friendly way to build, test, and deploy customized GraphQL APIs and ETLs for blockchain-facing applications.
Twitter | Discord | LinkedIn | Telegram | GitHub | YouTube
Last year I curated a series of videos for a partner project to introduce Subsquid and explain its core concepts, starting from the basics, up to some less-known features. With the new year, I decided to rewrite parts of the videos, re-adapt and re-record them to the latest changes in the SDK and create a new series that we decided to call Subsquid Academy.
Introducing Subsquid Academy
The goal of these articles (and videos that go along with it) is to provide a brief introduction to Subsquid, showcase how it helps blockchain and dApp developers, and get you more familiar with its main features.
This course is designed to make you curious about Subsquid and provide the notions and tools an aspiring developer needs to get started with building their own squid API.
We want to inspire you to take our framework and add your own creativity and ingenuity to it to create something great.
In our first lesson, we are going to introduce Subsquid. We are going to talk about the benefits of using the framework, its architecture and the advantages it brings.
We will then write our first squid project, learning how to index EVM logs, as well as accessing the smart contract’s state.
We will then take a look at Aquarium, the hosting service offered by Subsquid, deploying our API to make it publicly accessible and eliminate maintenance.
The course will end with some quick and very specific — but useful — examples that showcase additional features that were not covered in previous lessons.
There are a few things we could not include in this course, but luckily, there are plenty of resources out there to learn about TypeScript, GraphQL, Docker, EVM and other topics.
Pre-requisites
This course takes for granted that you have some experience in development — specifically with TypeScript or JavaScript — and that you have a good understanding of EVM blockchains, as it will make it much easier to understand the coding examples that we are going to work with.
For the coding parts of this course, I will be using both Mac OS, but I have tested it on Windows, running all of my code on Ubuntu 20.04 on Windows Subsystem for Linux. It’s my advice to all Windows users to do the same. You may choose your favorite Linux distribution from the Windows Store.
Naturally, all the code will run on Linux machines as well, similarly to Mac OS.
A squid project has two basic requirements: First, you need to have Node.js installed on your machine. We use version 16 and above for all projects.
Second, you need to have a Docker daemon that is able to expose ports to your host machines.
I have personally witnessed users having issues with Docker Toolbox, or with older versions, and who was trying to run it in conjunction with VirtualBox. For this reason — unless you really really know what you are doing — I’d advise making sure you have the latest version of Docker Desktop installed, either from the official website or from the system’s package manager.
Advice
To get the most out of this course, it is best to follow along, and have your terminal and your IDE ready when starting a lesson, maybe having them open next to the browser. This way, you’ll experience everything in the first person, and this has proven time and time again to be much better than passively listening. Feel free to pause and resume, or to use the time bar to go back a bit, should you need to.
If you have any questions or need help, the best place to get information about Subsquid are the SquidDevs Telegram group, our Discord server, specifically the channel dedicated to dev support.
What is Subsquid?
Over the course of the next lessons, I want to teach any developers interested in accessing information stored on-chain how to build their own blockchain data pipeline. But we need to talk about Subsquid first.
Subsquid is an indexing middleware for accessing blockchain data. At Subsquid, we are convinced that the mass adoption of Web3 will be driven by dApps with complex data models and high volumes of data written on- and off-chain. We want to make storage and indexing of this data inexpensive and incredibly fast.
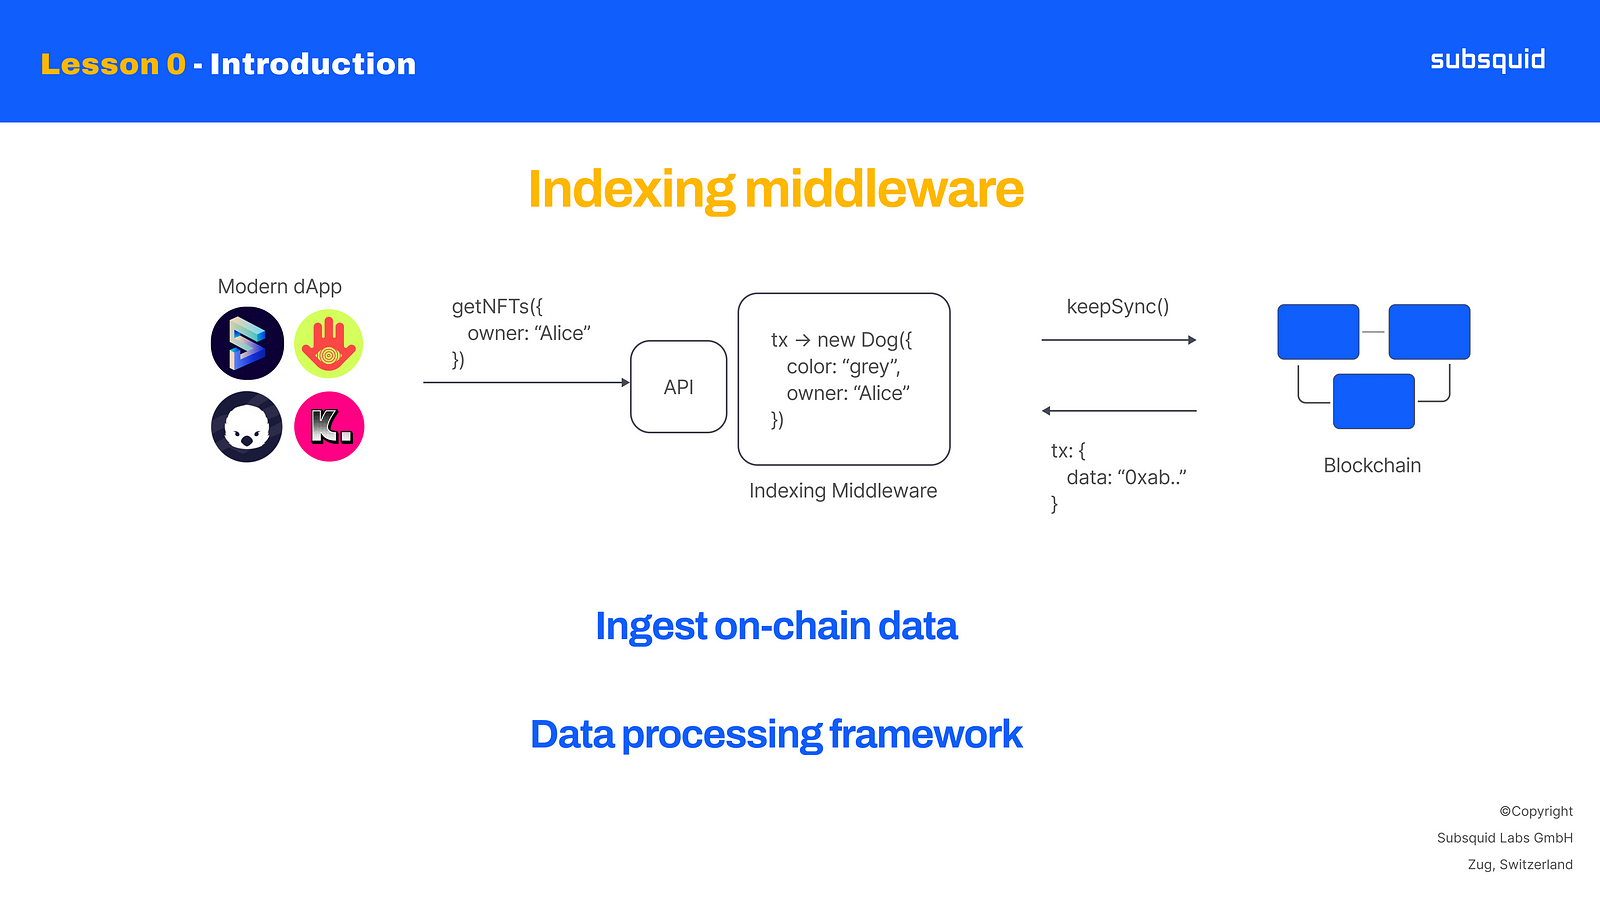
To do so, Subsquid offers a framework for ingesting and processing on-chain data, and for optionally presenting it via an API.
And here is where the unspoken question “OK, but why do we need Subsquid, specifically?” comes in. Let’s talk about it.
Why do we need Subsquid?
Over the last couple of decades, traditional internet companies have evolved in how they deal with data, and they learned how to use the right tool for the task.
In fact, they usually have data pipelines that include separate databases, data lakes and data warehouses for different tasks like data analysis, reporting, online data access, and caching. Such advanced infrastructure allows them to:
serve millions of users with millisecond latencies
get insights and make informed decisions by analyzing the data in real-time
scale on demand
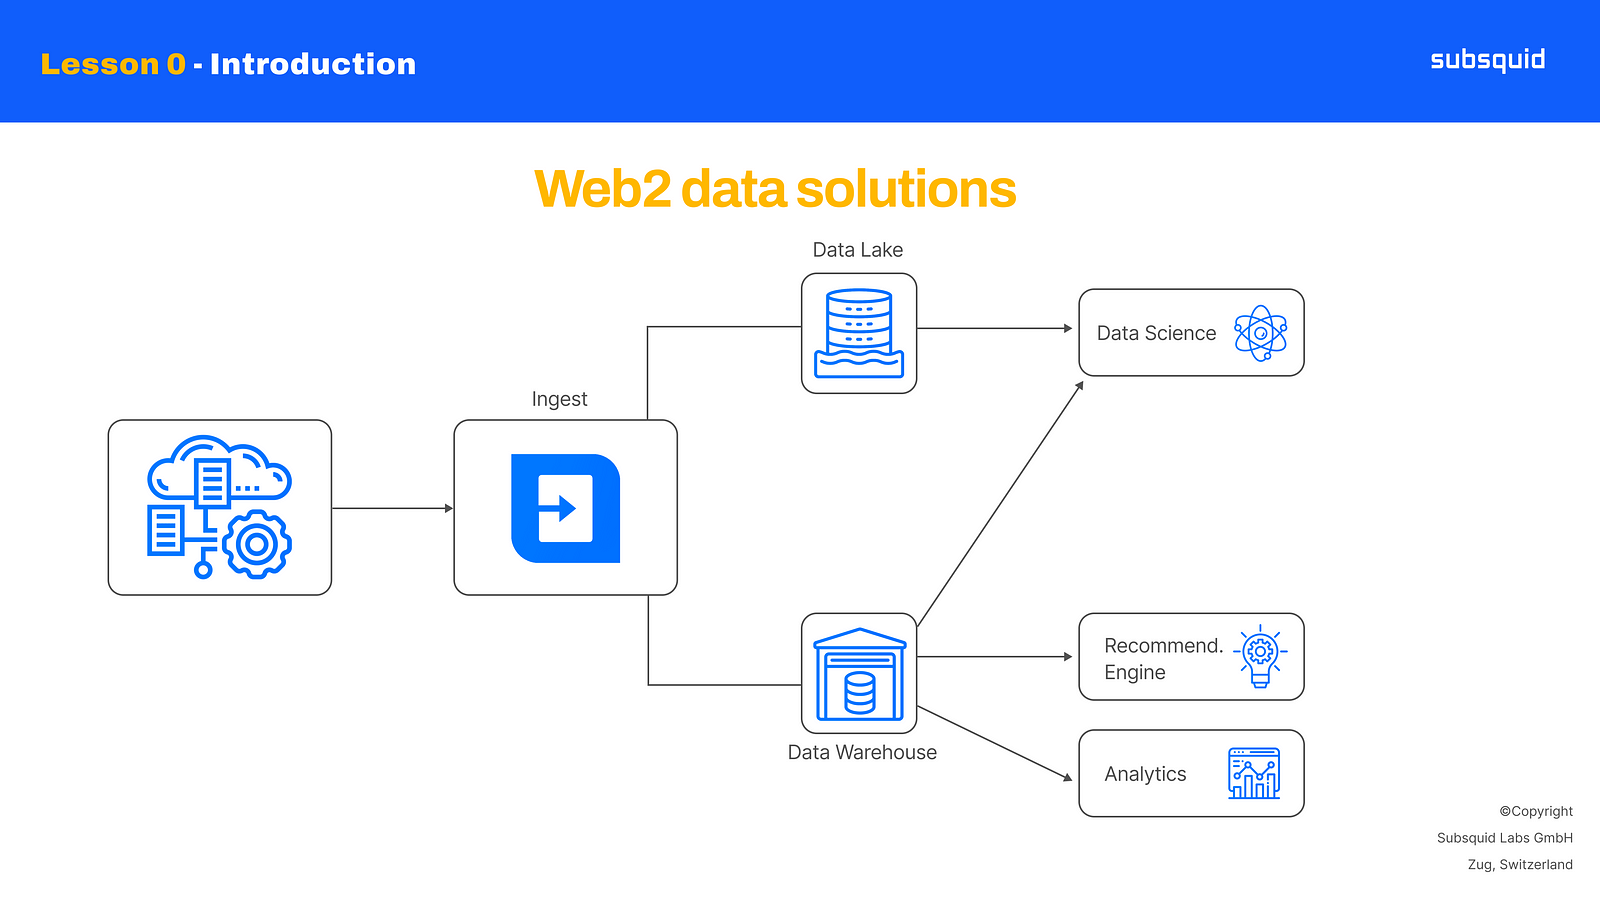
Web3 is currently in the phase where all data is stored on-chain. This is comparable to the state of the internet in the '90s, when simple websites were hooked directly to primitive databases. This configuration is impossible to scale, and will not support the number of users our industry hopes to onboard. It will also produce performances that are below today’s standards.
So to answer the question “why do we need Subsquid?”: we think blockchain and dApp developers need Subsquid to face these scalability and performance challenges and meet the requirements of next-gen Web3 use cases. Subsquid achieves this by providing the best tools for on-chain data projects. These include:
Type-safe data extraction and transformation
Automation for reproducible data flows
Integrations with data exploration and management tools developers often use, e.g. BigQuery, Python Notebooks and pandas
You can use Subsquid to cover a variety of use cases, like providing data to a frontend for a decentralized application or an analytics dashboard, for showing NFT data in an NFT marketplace, or even in many Web3 gaming scenarios!
Furthermore, Subsquid architecture is designed with decentralization in mind. We believe that decentralization is not only the key to Web3 and the freedom of information, but it is also a great tool for organic scaling and reducing infrastructure costs.
Subsquid architecture and components
Subsquid is unique in its approach to data indexing, and it all starts with our modular architecture: data pipelines are typically made of different stages and that’s exactly the inspiration for our architecture, which is made of two components: Archives and squids.
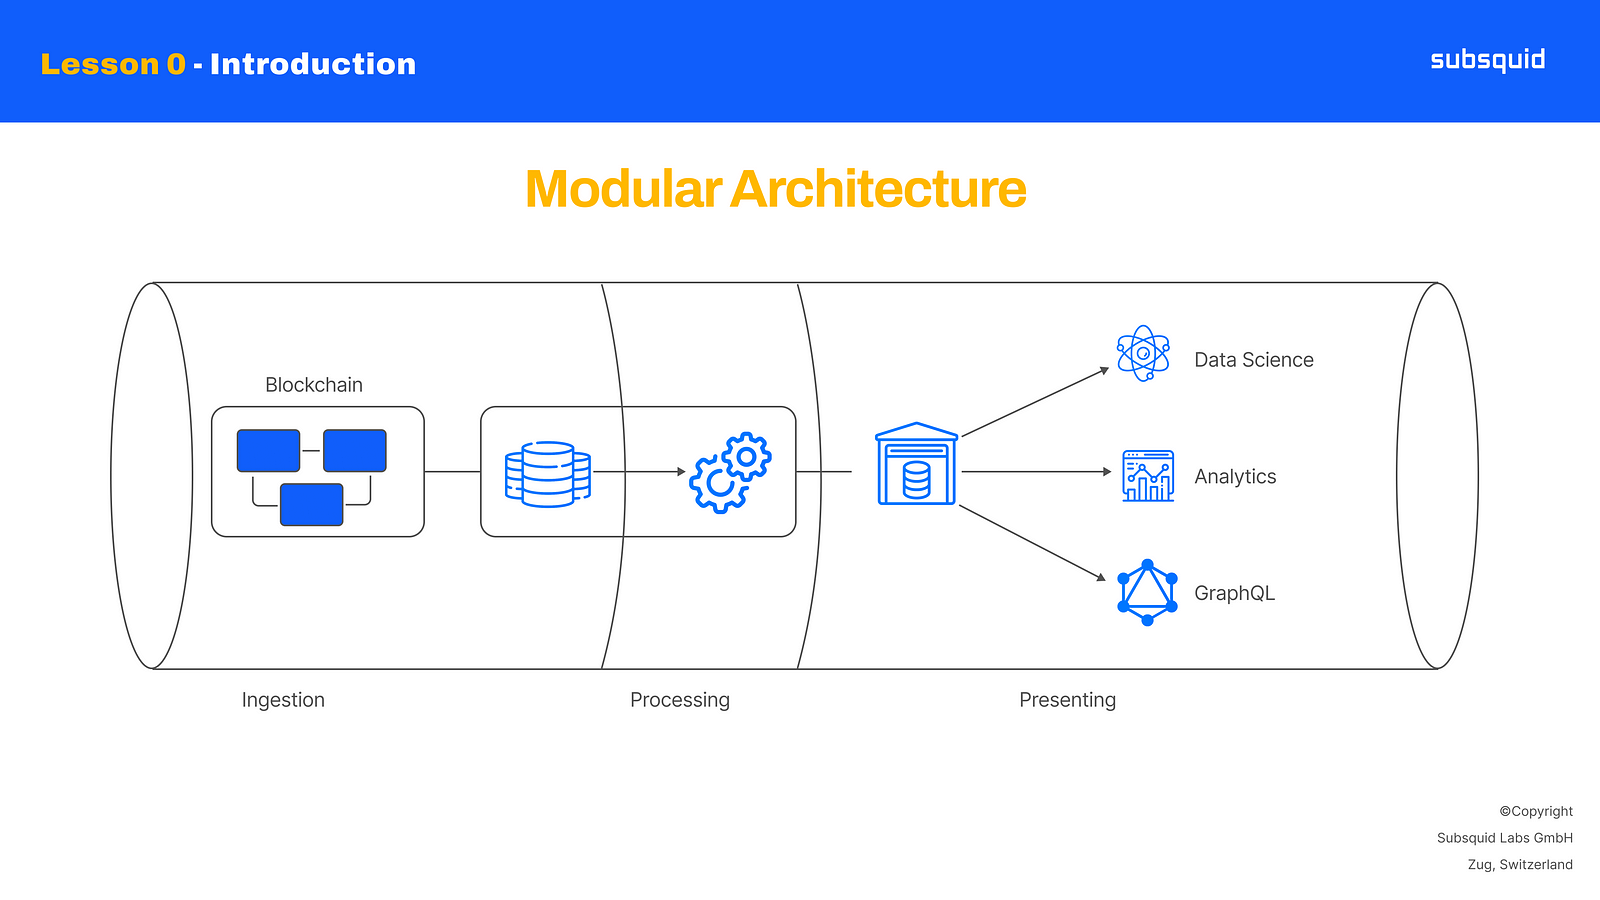
Modular Architecture schema
When it comes to indexing blockchain data, the first thing to do is to extract it from the blockchain. This is a necessary step that has close to no options for customization, so two developers could potentially extract raw data in the same way, even if the end result can be completely different. So we asked ourselves:
If a stage is always the same for everyone, why should everyone perform it? Why replicate something that can be done once and from which everyone can benefit? And our answer was:
Let’s create blockchain data ingestion services!
We called these Archives, and made sure they can be shared and used by multiple developers to build their own data transformation on top.
For the most part, you should not be concerned with Archives, other than for the fact that it’s where blockchain data is coming from. We need to introduce them anyway, mostly, to answer the unspoken question: “why do we need Archives?”
Why do we need Archives?
Archives make sure that different developers don’t have to extract the same information multiple times, avoiding duplicated efforts of data ingestion. Also, this means that as a developer you can focus on the transformation you want to apply to your data, because data extraction has already been done for you.
But these are not the only advantages they bring.

Archives ingest blockchain data by connecting to blockchain nodes, systematically requesting block information, and loading it into a database with a specific normalized format. Because of their design, databases offer much easier access to data, compared to blockchains, which means that, as a developer, it will be much faster to retrieve data from an Archive and transform it, rather than directly accessing the blockchain.
Speaking of retrieving blockchain data, Archives provide it through a GraphQL server, and this offers the ability to arbitrarily filter data and query it in batches. This further increases the overall performance of your data pipeline, because you can trim down unnecessary information and gain speed by minimizing the number of requests and network traffic.
Performance is only going to get better, as we research for more efficient storage alternatives and more advanced data operations, and this is another advantage of the modular architecture. As a matter of fact, our Ethereum Archive is part of a new generation of Archives, leveraging Parquet files, which are a much more efficient data storage both in terms of space and query speed.
Squids
Squids are the second component of our modular architecture.
This is the name we give to projects developed using our Software Development Kit, and as a developer, this is what you are mostly going to be interested in. You can build a squid to process and transform on-chain data to fit your needs, and we will go over a few examples in future lessons.
What’s important is that squids represent the second stage of your blockchain data pipeline. This is where you can decide the schema of your database, or the shape of your API and implement the logic to map raw on-chain data to the final result you want to obtain.
Building data pipelines is a tall task, and we already try to simplify it by taking care of data ingestion with Archives and letting developers focus on the stage they care about the most: data transformation.
But Subsquid’s framework goes beyond that: We have created a set of libraries that provide the necessary tools to fetch data from Archives in the most efficient manner possible. You just apply your own custom logic and save it onto a database.
Moreover, the SDK comes with a few command line tools that generate code automatically, to save time and effort, but most importantly, to reduce the number of bugs. Rest assured, we will get to see all of these features in greater detail later in this course.
When developing a squid, we connect to an Archive, request the information we are interested in, apply the custom logic we need for our specific application and then save it.
This logic can be aggregations for an analytics platform, or some decoding and formatting to present data to a frontend, so that this user interface client is lighter, faster and easier to develop.
Squid structure
I wanted to end this first lesson with a deep dive into the structure of a squid project, explaining some of its main components. We are going to take a look at the template repository available at:
github.com/subsquid/squid-evm-template
While Subsquid is capable of indexing other blockchains as well, like Polkadot and any Substrate-based chain, this template was created for EVM chains like Ethereum and Polygon, so that’s why EVM is specified in the repository’s name.
This template has two main purposes. The first is to, of course, act as a template, which is why we are going to click the button “Use this template” and essentially fork it into our own account.
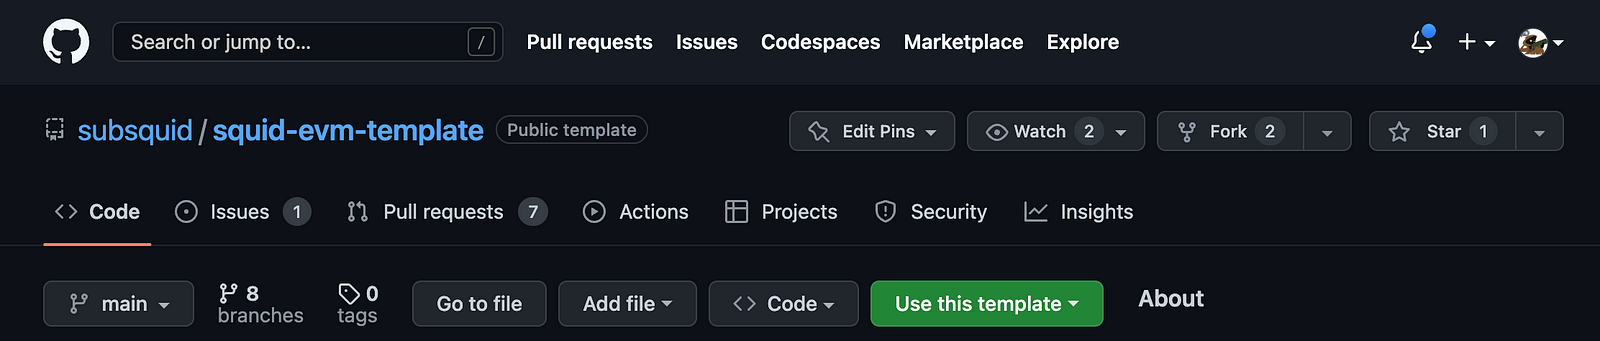
Forking the template repository to start a new project
Note: this is no longer strictly necessary, thanks to the latest updates in Subsquid's CLI, you can initialize a project with the
sqd initcommand. Read more on our docs website.
We can then go to our favorite IDE and clone it. This can also be done via the terminal, if you prefer to do so.
Once that’s done, and we have the project open, we can talk about the second purpose of this repository, which is to serve as a simple, basic example to show how the Subsquid SDK works.
A Squid is, in the end, a Node.JS project, and it comes with a package.json containing scripts definitions and dependencies, including Subsquid’s own libraries. I advise installing them, so that when we open files, they won’t be full of missing dependency errors.
From the project’s root folder in a console window, simply run the command
npm i
Once done, let’s also build the project with:
npm run build
The resulting JavaScript files, which we are going to launch in the last section of this lesson can be found in the lib folder.
Let’s now navigate the project and highlight its most important components, starting with the schema.graphql file. This file defines the data schema, which is used in the project.
type MyEntity @entity {
  id: ID!
  foo: String!
}
In this case, the template defines an object named MyEntity.
In relation to this, I want to draw your attention to the src/model/generated folder, which contains as many model files as the number of entities defined in the schema we just looked at.
This is because these model files are, in fact, automatically generated from the data schema itself and we’ll find out how in the next section.
Each model is a TypeScript definition of the types defined in the schema.graphqlfile, and as such, they will contain the same fields.
One more file to look at is the docker-compose.yml file, which defines a database service, specifically, a postgresql container, which is where the project will save processed data.
It’s finally time to talk about the main actor of a Squid project, and that is the processor.ts file.
import { TypeormDatabase } from "@subsquid/typeorm-store";
import {EvmBatchProcessor} from '@subsquid/evm-processor'

const processor = new EvmBatchProcessor()
  .setDataSource({
    // uncomment and set RPC_ENDPOONT to enable contract state queries.
    // Both https and wss endpoints are supported.
    // chain: process.env.RPC_ENDPOINT,

    // Change the Archive endpoints for run the squid
    // against the other EVM networks
    // For a full list of supported networks and config options
    // see https://docs.subsquid.io/develop-a-squid/evm-processor/configuration/

    archive: 'https://eth.archive.subsquid.io',
  })
  .addTransaction([
    '0x0000000000000000000000000000000000000000'
  ], {
    range: {
      from: 6_000_000
    },
    data: {
      transaction: {
        from: true,
        input: true,
        to: true
      }
    }
  });


processor.run(new TypeormDatabase(), async (ctx) => {
  for (let c of ctx.blocks) {
    for (let i of c.items) {
      // apply arbitrary data transformation logic here
      // use ctx.store to persist the data
      ctx.log.info(i, "Next item:")
    }
  }
});
This is where the data processing logic is defined so let’s look at its structure.
It is, of course, necessary to import some classes and functions from Subsquid’s own libraries and the model and event classes we just discussed.
The next thing to do is to instantiate the EvmBatchProcessor class and configure it by using the appropriate functions to set the data source and the batch size, which is the number of blocks we can ingest in one single request to the Squid Archive. Getting data in batches speeds up data processing, limiting the impact of network traffic.
With the addTransaction function, we are telling the processor we are interested in processing EVM transactions, and the function allows us to specify one, or multiple contract addresses. The second argument is an optional object we can use to further filter down incoming information. In this case, the template specifies a starting block for processing these transactions, and a filter to what kind of information we want the Archive to return.
The run() function call is then used to launch the processor. This function accepts two parameters: the first one is an instance of a database class, and the second one is the function that should be triggered when we receive a “bundle”, or more appropriately, a batch of events from the Archive.
This function has to be asynchronous and accept one parameter, which complies with the BatchHandlerContext interface defined in Subsquid’s libraries. In the case of the squid template, this second argument is a so-called “arrow function”.
The run() function will let the processor start requesting blockchain data from the genesis block, unless configured otherwise, up until the chain head. When it gets to that point, it will maintain synchronization by processing new blocks as they are being mined and ingested by the Archive.
The logic of the template is actually quite trivial, as it only loops over the blocks of a batch, and the items contained in them, logging the item itself.
Let's finish this lesson by running our project.
In a terminal window, let’s type
docker compose up -d
This will use the docker-compose.yml file we saw earlier, pull the image, and run a new container for this project. It’s advisable to use the -d option, to unlock the terminal when the container starts successfully.
Next, we need to apply a database migration, to create the database schema, with the necessary tables. In a new terminal window, let’s run
npx squid-typeorm-migration apply
This will read the migration file that comes with the project, you can find it in the db/migrations and execute the SQL statements defined in it.
We are ready to launch the project. We can now run the command
node -r dotenv/config lib/processor.js
And we’ll start to see some logging appear. The -r option is useful to launch the JavaScript file with the environment modified by the .env file.
You should be able to see that it is mapping on average 5 to 6 thousand blocks per second and even more items per second.
One final thing we can do is open a second terminal and type
npx squid-graphql-server
to launch a graphql server. It says it’s listening on port 4350, so let’s open a browser, at the address localhost:4350/graphql.
This is a GraphQL playground where we can test out queries and look at our data, even as it is being indexed.
We’ll be seeing in future videos how to interact with a more complex schema, and generate queries.
This concludes this section, in this video, we covered:
How to start squid development by forking the template repository
The typical project structure
where the data schema is defined
And where the business logic for your data processing should be defined.
In the next lesson, we will start making changes to our project, in order to achieve our goal of indexing EVM logs of smart contract events.
Stay tuned for the next installments in this series, let's build awesome stuff together!


