Summary
Blockchain data indexing is a performance enhancer for dApps, but it’s a pain to develop your application locally, because, somehow, no one thought about indexing a local EVM node… 😡😤
…Until Subsquid decided to put an end to this.
By working with an indexing middleware from the very early stages of a project, developers can build their dApp locally, deploying it on a local node, and index that local node with a squid.
This generates a much smoother developer experience, safer applications that can be thoroughly tested prior to the smart contract being deployed, and a much tighter development cycle, which leads to faster and more efficient deliveries.
The project discussed in this article is available at this repository:
github.com/RaekwonIII/local-evm-indexing
For the development of the squid indexer, Ganache is going to be taken as a reference, because of these factors:
the provided
MetaContractis simple, yet "interesting" enough from an indexing point of view, to create an examplethe
truffle consoleallows to easily create transactions from the command line and emulate smart contract actions
But the same actions can be done with Hardhat and Anvil (and very likely, there will be future articles about them).
Introduction
I have been dipping my toes in smart contract development for a little while now, and recently I have published an article detailing a full walkthrough on how to improve the performance of a dApp (an NFT marketplace, in this case), using blockchain indexing.
While developing this project, I really put myself in the shoes of developers that are using Subsquid’s SDK on a daily basis, and I started to realize one of the most annoying facts that might hinder indexer’s adoption, dApp development, and ultimately, the user experience.
The blockchain industry has recognized pretty quickly, that smart contract development needs local development environment. And this has brought to the creation of tools like Truffle, then Hardhat, and (as I recently discovered) Anvil.
These tools allow developers to launch a minimal EVM node, to which developers can deploy, run, test the smart contract(s) they are developing. But a decentralized application is not just the smart contract itself: what about the frontend?
Developing dApp frontend locally
I wanted to show that connecting the frontend of a dApp to an indexing middleware leads to better performance, compared to direct calls to the blockchain. But while developing this project, I needed to index my local Ethereum node, running on Hardhat.
This was a sudden realization for me, and a breakthrough-moment.
dApp frontend local development is being treated as an after-thought
Without the ability to index their local node, a typical developer journey looks pretty much like this:
build the application with connections to smart contract to work locally
deploy on a testnet
change project to use indexing middleware
finish testing in this configuration
deploy to mainnet/production
But this is not the best developer experience, nor the safest and most efficient way to work.
Luckily, Subsquid put an end to this, by publishing Docker images for their Ethereum Archive (which you can find on DockerHub). By launching this container, an Archive service will be running on your machine, ingesting the local node’s blocks.
This allows developers to build a squid indexer, based on the local node data, exactly the same way they would do if the contract was deployed on testnet.
Let’s build it!
As mentioned at the start of the article, I chose to use Truffle suite and Ganache for an and-to-end project.
As previously explained, this choice was made out of convenience, but the same result could be achieved on Hardhat, using ethers library, as it's shown in their documentation (as a matter of fact, I might be writing a future article about this, stay tuned for that 😉).
The following section will cover the setup, a sample smart contract from Ganache, its deployment to the local node, and the generation of some transactions.
For this tutorial, I also chose to start with a squid project, and we are going to use it to manage Ganache configuration. This is not strictly necessary, it is only useful to work on one single folder and keep this tutorial as simple as possible.
Squid project setup
If you haven’t already, you need to install Subsquid CLI first:
npm i -g @subsquid/cli@latest
In order to create a new squid project, simply open a terminal and launch the command:
sqd init local-evm-indexing -t evm
Where local-evm-indexing is the name we decided to give to our project, you can change it to anything you like. And -t evm specifies what template should be used and makes sure the setup will create a project from the EVM-indexing template.
The next two sections are instructions dedicated to the two main options for local Ethereum development: Hardhat and Ganache. For that, and other similar tools I might not be aware of, the configuration should still be very similar.
Ganache setup
In order to start working with Ganache node, it’s necessary to Install Truffle and Ganache packages.
1. Truffle project, sample contract
Let’s create a new truffle project, for example by downloading a sample contract. In a console window, from the project’s main folder, launch this command:
truffle unbox metacoin
To compile the contracts, launch this command in the same console window:
truffle compile
You should find the contract’s ABI at the location: build/contracts/MetaCoin.json, it will be useful for indexing.
2. Create a workspace
First of all, make sure the development configuration, in the networks section of truffle-config.js is uncommented, and has these values.
development: {
  host: "127.0.0.1",     // Localhost (default: none)
  port: 8545,            // Standard Ethereum port (default: none)
  network_id: "1337",       // Any network (default: none)
},
Note: It is not mandatory to change
portornetwork_id, but I initially set them to the same value that Hardhat uses, out of convenience. It's important that they are the same as the Ganache server, though.If you decide not to change them, please be aware of the values, and correctly apply these in the Archive image parameters.
Launch the Ganache tool and select the New Workspace (Ethereum option).
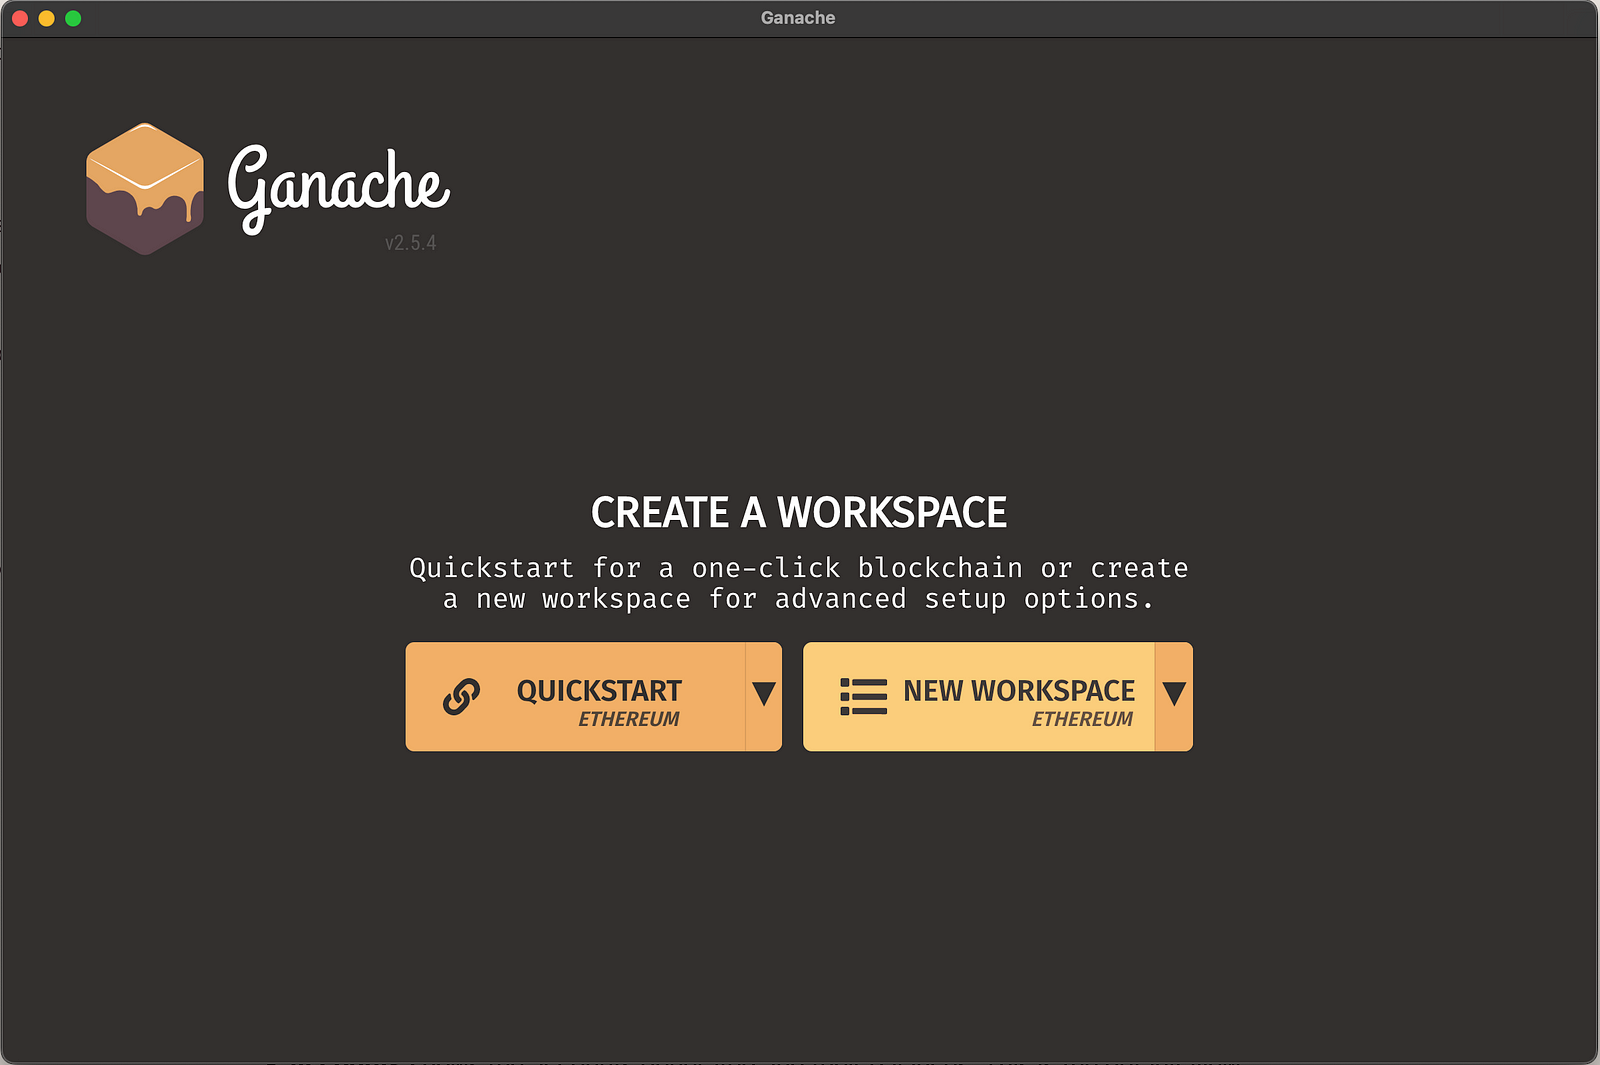
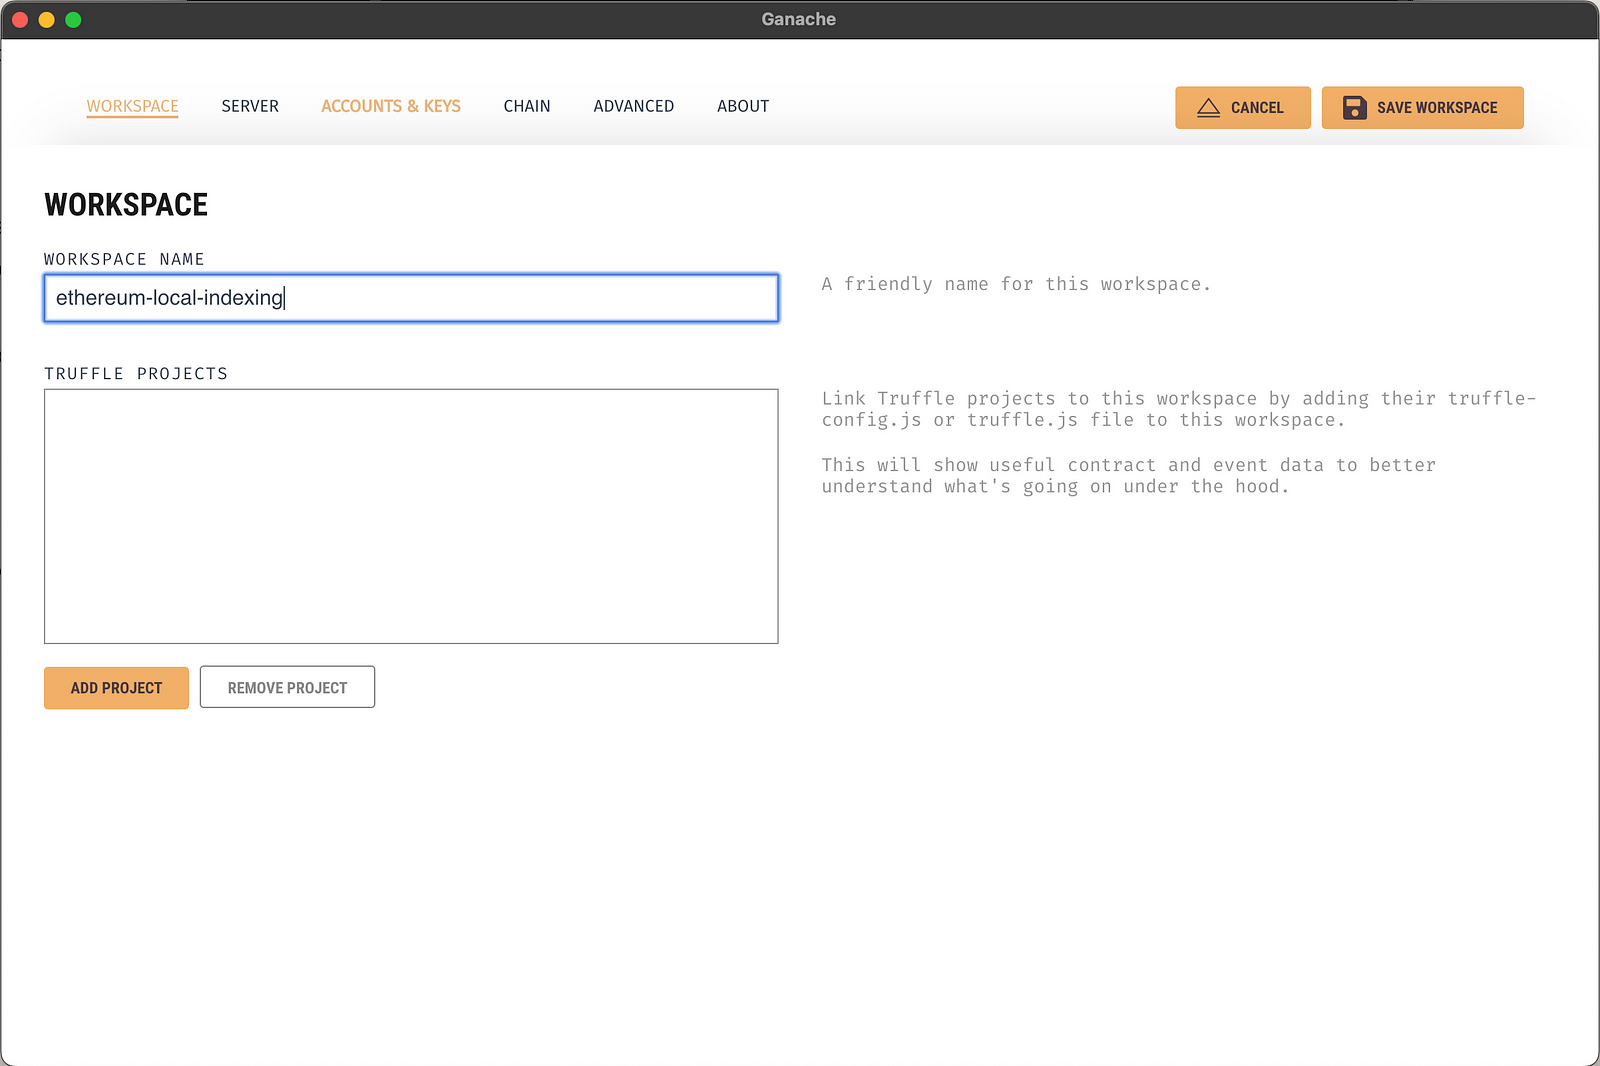
In the following window, provide a name for the workspace, and link the Truffle project we just created, by clicking on Add project button and selecting the truffle-config.js file in the project's root folder. Finally, select the Server tab at the top.
In this window, change the server configuration to the exact values reported in this image.
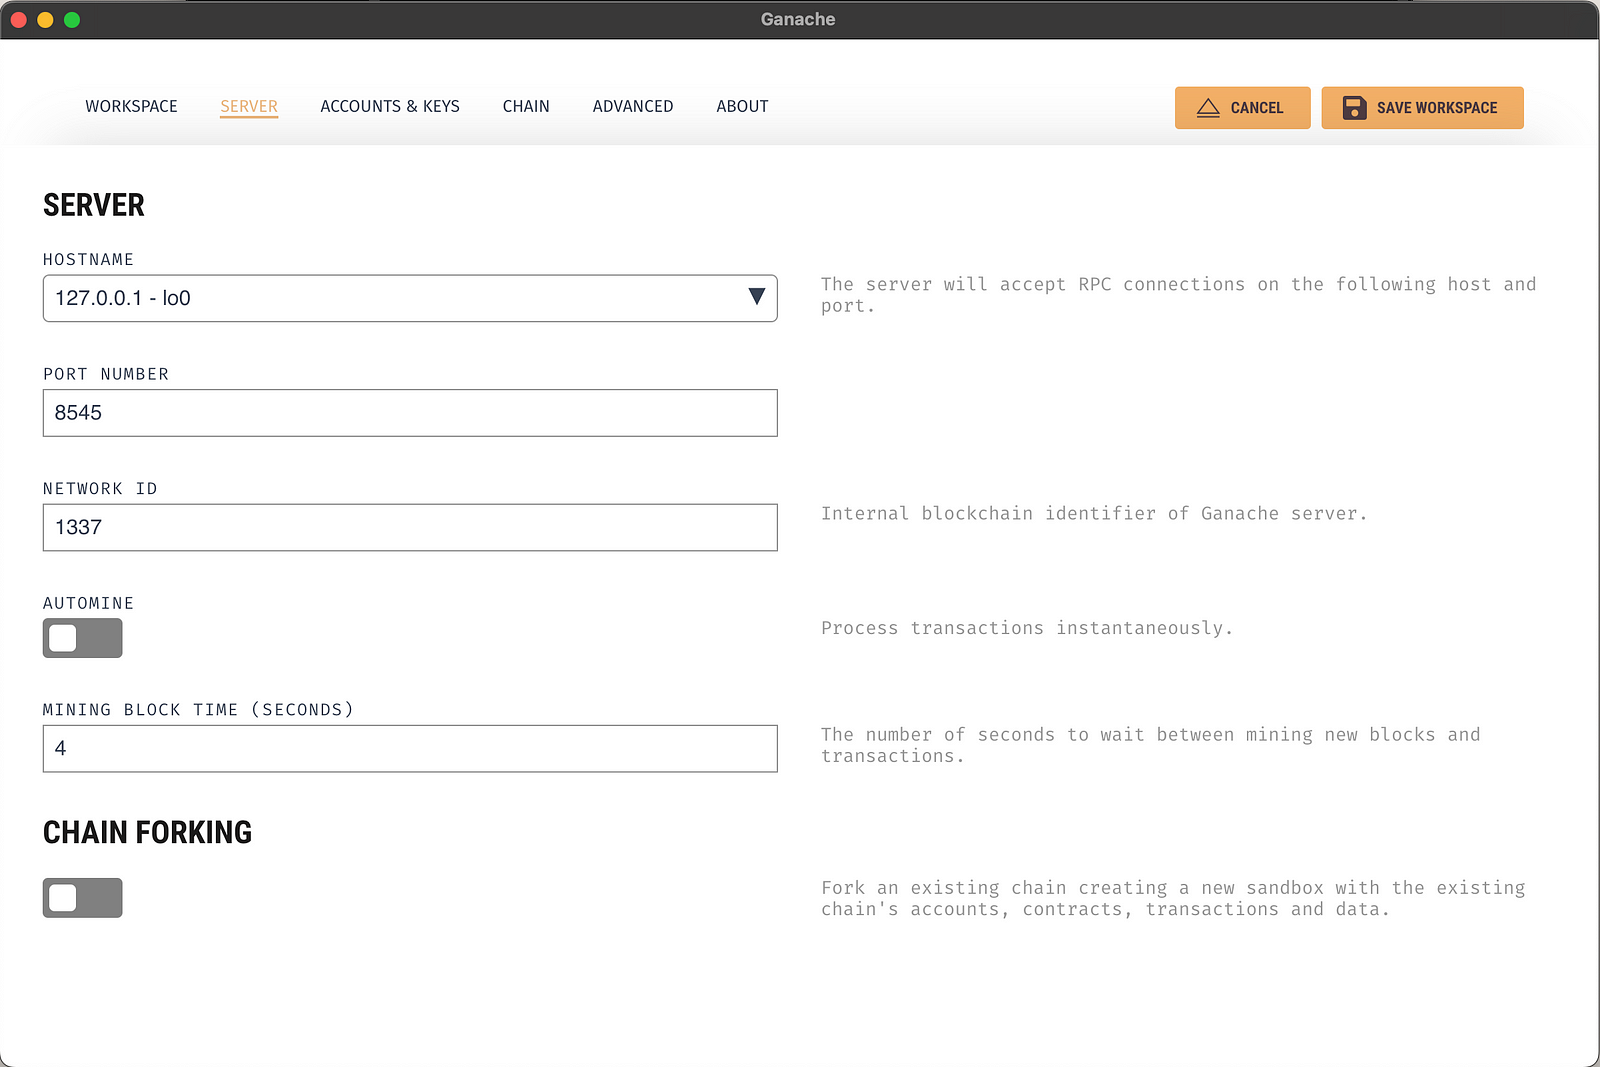
If you encounter issues with these settings, try and change the HOSTNAME value to 0.0.0.0 — all interfaces.
Note: It is not mandatory to change
PORT NUMBERorNETWORK ID, but they are set to the same value as Hardhat, so the rest of the Tutorial will look the same.The
AUTOMINEoption is disabled, same as in the Hardhat section of this tutorial, for debugging purposes. For more information, consult the official documentation.
3. Deploy the contract
With the Truffle suite, you can simply deploy any contract in the contracts directory by running
truffle migrate
You should, a this point, see a log similar to this:
Compiling your contracts...
===========================
> Everything is up to date, there is nothing to compile.

Starting migrations...
======================
> Network name:    'development'
> Network id:      1337
> Block gas limit: 6721975 (0x6691b7)
1_deploy_contracts.js
=====================
   Replacing 'ConvertLib'
   ----------------------
   > transaction hash:    0x268debaaefe5ed181d0f7eb41f8c0a12b378a0c076910507b654fa6818889c49
   > Blocks: 0            Seconds: 0
   > contract address:    0x65cb02943D325A5aaC103eAEea6dB52B561Ee347
   > block number:        13
   > block timestamp:     1675251575
   > account:             0x62B9eB74708c9B728F41a2D6d946E4C736f1e038
   > balance:             99.99684864
   > gas used:            157568 (0x26780)
   > gas price:           20 gwei
   > value sent:          0 ETH
   > total cost:          0.00315136 ETH
   Linking
   -------
   * Contract: MetaCoin <--> Library: ConvertLib (at address: 0x65cb02943D325A5aaC103eAEea6dB52B561Ee347)
   Replacing 'MetaCoin'
   --------------------
   > transaction hash:    0x35a35781d5b4947285caf8d9f901d9be7a675821b9c4ec934bc2be2d7e9e85cb
   > Blocks: 0            Seconds: 4
   > contract address:    0xc0Bb32fc688C4cac4417B8E732F26836C594C258
   > block number:        14
   > block timestamp:     1675251580
   > account:             0x62B9eB74708c9B728F41a2D6d946E4C736f1e038
   > balance:             99.98855876
   > gas used:            414494 (0x6531e)
   > gas price:           20 gwei
   > value sent:          0 ETH
   > total cost:          0.00828988 ETH
   > Saving artifacts
   -------------------------------------
   > Total cost:          0.01144124 ETH
Summary
=======
> Total deployments:   2
> Final cost:          0.01144124 ETH
Make sure to take note of the contract address, we'll be using this later, while indexing. In the case reported here, it's 0xc0Bb32fc688C4cac4417B8E732F26836C594C258.
4. Generate test transactions
Then, I ended up following the steps described in this Truffle documentation page to generate a few transactions on the MetaCoin contract I had previously deployed.
I launched the console first:
truffle console
Your prompt should have changed to this:
truffle(development)>
Then obtained an instance of the contract, and used it to trigger the sendCoin function, and send coin to 4 other accounts.
let instance = await MetaCoin.deployed()
let accounts = await web3.eth.getAccounts()
instance.sendCoin(accounts[1], 10, {from: accounts[0]})
instance.sendCoin(accounts[2], 10, {from: accounts[0]})
instance.sendCoin(accounts[3], 10, {from: accounts[0]})
instance.sendCoin(accounts[4], 10, {from: accounts[0]})
I can also verify that the first account now has 40 “coins” less than the initial 10000 allotted by Ganache:
truffle(development)> let balance = await instance.getBalance(accounts[0])
truffle(development)> balance.toNumber()
9960
Archive Docker image
In order to index the local Ethereum node, we need to use a pre-built Docker image of Subsquid’s Ethereum Archive. You can do it, by creating a docker-compose.archive.yml file (I have added one in the archive folder) and paste this:
version: "3"

services:
  worker:
    image: subsquid/eth-archive-worker:latest
    environment:
      RUST_LOG: "info"
    ports:
      - 8080:8080
    command: [
            "/eth/eth-archive-worker",
            "--server-addr", "0.0.0.0:8080",
            "--db-path", "/data/db",
            "--data-path", "/data/parquet/files",
            "--request-timeout-secs", "300",
            "--connect-timeout-ms", "1000",
            "--block-batch-size", "10",
            "--http-req-concurrency", "10",
            "--best-block-offset", "10",
            "--rpc-urls", "http://host.docker.internal:8545/",
            "--max-resp-body-size", "30",
            "--resp-time-limit", "5000",
            "--query-concurrency", "16",
    ]
    # Uncomment this section on Linux machines.
    # The connection to local RPC node will not work otherwise.
    # extra_hosts:
    #   - "host.docker.internal:host-gateway"
    volumes:
      - database:/data/db

volumes:
  database:
Now, let's open the commands.json file, and add archive-up and archive-down to the list of commands. It's not mandatory, but these shortcuts are quicker to type, and easier to remember! 😅
{
    "$schema": "https://cdn.subsquid.io/schemas/commands.json",
    "commands": {
      // ...
      "archive-up": {
        "description": "Start a local EVM Archive",
        "cmd": ["docker-compose", "-f", "archive/docker-compose.archive.yml", "up", "-d"]
      },
      "archive-down": {
        "description": "Stop a local EVM Archive",
        "cmd": ["docker-compose", "-f", "archive/docker-compose.archive.yml", "down"]
      },
      // ...
    }
  }
Then start the service by opening the terminal and launching the command:
sqd archive-up
Squid development
It's finally time to index the smart contract events we generated earlier, with Subsquid’s SDK. Using the contract’s ABI and contract address from previous steps.
If you want to know more about how to develop your squid ETL, please head over to the dedicated tutorial on Subsquid’s official documentation.
Schema
Since we are using MetaCoin contract as a reference, so we'll build a schema that makes sense with respect to the data it produces.
type Transfer @entity {
  id: ID!
  block: Int!
  from: String! @index
  to: String! @index
  value: BigInt!
  txHash: String!
  timestamp: BigInt!
}
And now let's generate the TypeScript model classes for this schema. In a console window, from the project’s root folder, type this command:
sqd codegen
ABI facade
We also need to generate TypeScript code to interact with the contract, and for that, we need the contract's ABI.
Luckily, Truffle generates that when it compiles the Solidity code, and puts the ABI under build/contracts(and Hardhat does the same under artifacts/contracts/). So let's use Subsquid CLI tools and in a console window, from the project’s root folder, type this command:
sqd typegen build/contracts/MetaCoin.json
Processor configuration
Let's open the processor.ts file, and make sure we import the new Transfer model, as well as the ABI facade. From this, we are only going to import the events object.
import { Transfer } from './model';
import { events } from './abi/MetaCoin';
Because we want to index our local Archive, the data source of the processor class needs to be set to the local environment.
I have also createad a constant for the address of the contract we deployed, and always remember to toLowerCase() your contract addresses, to avoid issues.
And finally, we want to configure the processor to request data about the Transfer event:
// ...
const contractAddress = "0xc0bb32fc688c4cac4417b8e732f26836c594c258".toLowerCase()
const processor = new EvmBatchProcessor()
  .setDataSource({
    chain: "http://localhost:8545",
    archive: "http://localhost:8080",
  })
  .addLog(contractAddress, {
    filter: [[events.Transfer.topic]],
    data: {
      evmLog: {
        topics: true,
        data: true,
      },
      transaction: {
        hash: true,
      },
    },
  });
// ...
You can also use environment variables, just like shown in this complete end-to-end project example. This will make sure the project will stay the same, and only configuration files containing environment variables will be changed, depending on the deployment.
Process events
We now need to change the logic of the processor.run() function, to apply our custom logic.
In order to process Transfer events, we need to "unbundle" all the events our processor receives from the Archive in a single batch, and decode each one of them.
The best practice in this scenario, is to use an array as a temporary data storage, and save all the processed transfers at the end, in another batch operation. This will yield better performance, as data storages such as the Postgres database we are using at the moment, are optimized for this. The code should look like this:
processor.run(new TypeormDatabase(), async (ctx) => {
  const transfers: Transfer[] = []
  for (let c of ctx.blocks) {
    for (let i of c.items) {

      if (i.address === contractAddress && i.kind === "evmLog"){
        if (i.evmLog.topics[0] === events.Transfer.topic) {

          const { _from, _to, _value } = events.Transfer.decode(i.evmLog)

          transfers.push(new Transfer({
            id: `${String(c.header.height).padStart(10, '0')}-${i.transaction.hash.slice(3,8)}`,
            block: c.header.height,
            from: _from,
            to: _to,
            value: _value.toBigInt(),
            timestamp: BigInt(c.header.timestamp),
            txHash: i.transaction.hash
          }))
        }
      }
    }
   }
   await ctx.store.save(transfers)
});
Run and test
It's finally time to perform a full test. Let's build the project first:
sqd build
Then, we need to launch the database Docker container, by running the command:
sqd up
Next, we need to remove the database migration file that comes with the template, and generate a new one, for our new database schema:
sqd migration:clean
sqd migration:generate
And we can finally launch the processor:
sqd process
In order to test our data, we can launch the GraphQL server as well. In a different console window, run:
sqd serve
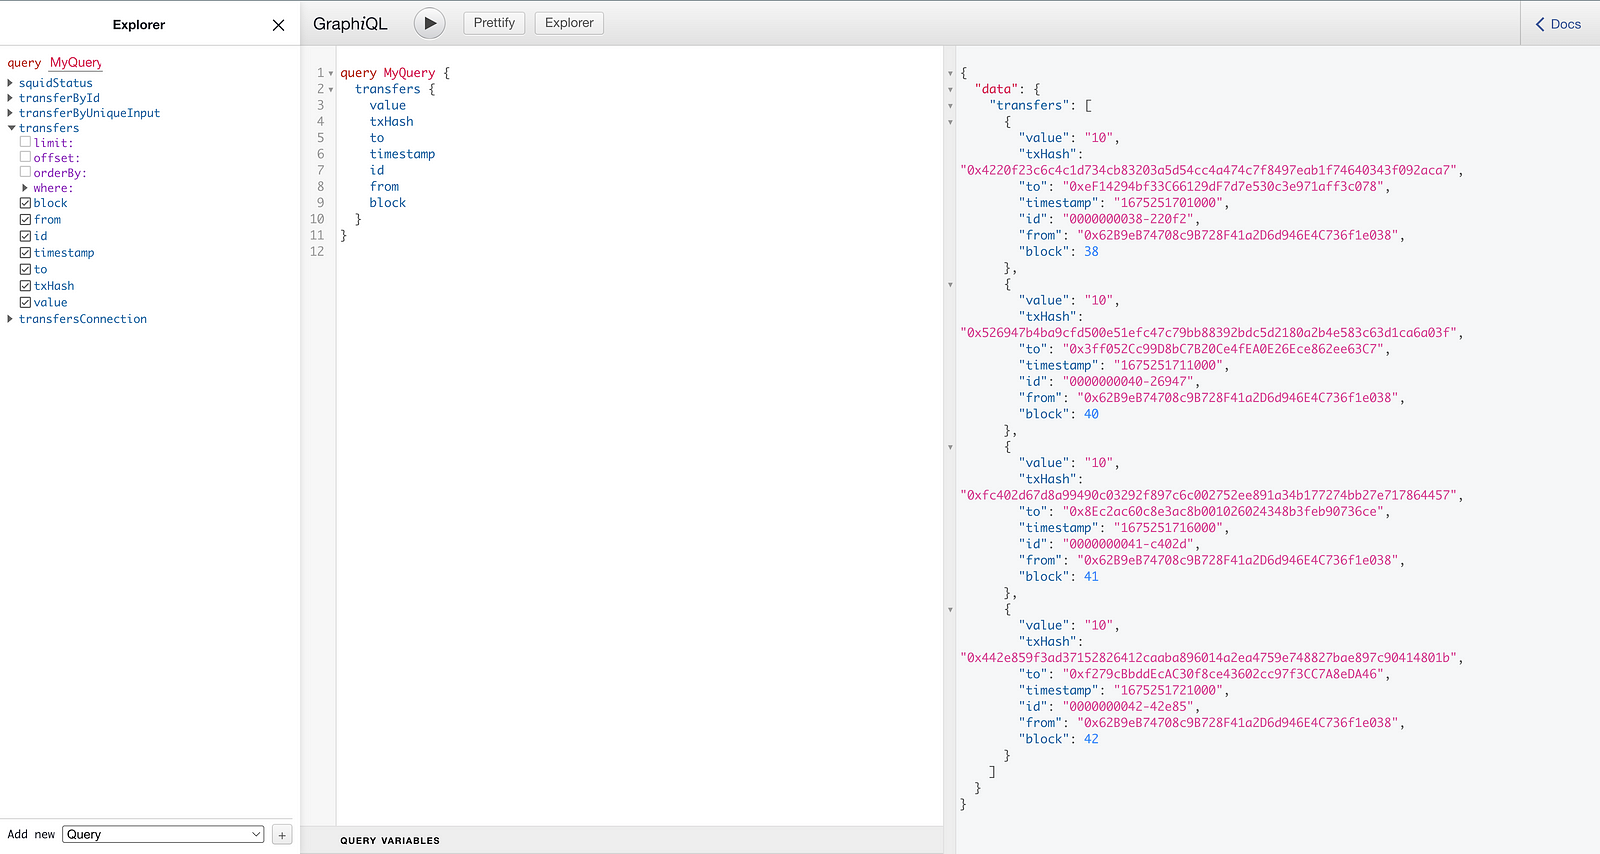
And perform a test query:
query MyQuery {
  transfers {
    amount
    block
    from
    id
    timestamp
    to
    transactionHash
  }
}
Conclusions
What I showed you here is that thanks to Subsquid, it is possible to start working with an indexing middleware from the very early stages of a project.
Developers can build their dApp by building their smart contract locally, deploying it on a local node, and indexing that local node with a squid. This leads to a development and testing cycle with much tighter iterations.
Furthermore, since the indexing middleware is present from the start, fewer changes have to be made (just changing the chain, address, and the contract address itself).
If you found this article interesting, and you want to read more, please follow me and most importantly, Subsquid.
**Subsquid socials:
**Website | Twitter | Discord | LinkedIn | Telegram | GitHub | YouTube

